Today is day three on fitting the cowl to the RV-12 airplane with the Rotax engine installed.
Reference: Page 38-05.
Step 4: Clamp the lower half of the Side Hinges to the upper edge of the lower cowl. The aft edge of the side hinges should be flush with the marks made in step 3.
Step 5: Drill #40 the rivet pattern laid out into the bottom cowl & side Hinges.

Step 6: Using the Cowl Hinge Pin as a guide mark the cowl pin inter section on the bottom cowl.
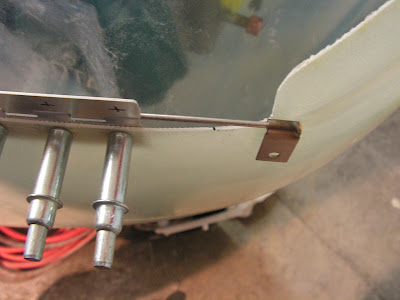
Step 7: Trim (shorten) the pins until the aft edge of the knuckles alines with the mark on the cowl made in the last step. Bend a jog in the pin so the knuckles lay flat against the bottom cowl surface.

This completes page 38-05.
Reference: page 38-06 Builder's note: THis is were have the engine installed is a pain, since you can't just reach in through the spinner opening to hold the hinges. I use a long pice of wood to hold the hinge against the cowl as it was drilled. Still care must be used so as not mess up the hole in the hinge. This being said I'm glad I had the Rotax hung at this point and would do it this way again.
Step 1 & 2: Install the top cowl & cleco it to the bottom cowl . Checking that the contours of the top cowl match those of the fuselage skins and bottom cowl.
Drill #40 through the top cowl and the Upper Cowl Hinges the most inboard hole and cleco.

Step 3: Mark and Create a notch for the pin knuckles to allow the Pinsto be slipped out without catching on the top or bottom cowl.

Step 4 & 5: Drill #40 then cleco the two remaining holes on each end of the side top and bottom cowl. Then drill and cleco the remaining holes through the top cowl.

Step 6: Hold the forward portion of the Side Hinges tightly against the top cowl. Dril #40 then cleco the forward most hole location and work aft, drilling all top cowl holes to the side hinge rivet hole locations.
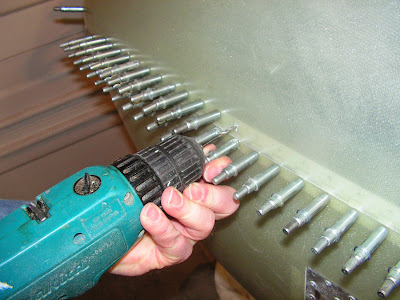
Step 7: Starting from the top drill #40 and cleco the remaining holes locations through the Mid Cowl Hinges and bottom cowl.

Step 8: Starting at the bottom drill and colec the remaining holes in the lower cowl hinges.

Reference: Page 38-07
Step 6: Using a unibit drill "starter holes and make the opeing for the Oil Door in the top cowl.


So to finish today's work, decided to roughen the mating surfarce of the cowl hinges and then to epoxy these in place before countersinking the rivet holes. This is the same process I used on the RV-10's cowl but used a Hysol product to do the bonding. At the very least it will make countersink the holes easier as the aluminum will back up the fiberglass.

The hinges need time to setup and it is late so I'm calling it a night.

