Sunday, December 6, 2009

RV-10 Doors

This is the final install of the doors - well until they are taken off and remounted for paint! But this does give me a chance to cover some of the finer point I have learned about fitting the doors.

First I never could get the Van's door seals to fit correctly. So, following what other RV10 builders have done I installed McMaster Carr seal material it's part number 1120A311.


As you can see it gives a nice seal.


Of course with any modification there is extra work. First the door frame needed to be trimmed to fit the new seal.


Also, the door hinge area on the top of the door must be covered to provide a new seal landing over the hinges. I used fiberglass scrapes left over from trimming the door and epoxied these into place and glassed over them.


Now this creates a new challenge. The frame mount for the gas strut hits the the new door seal area. To solve this, I choose to make new strut mount landing that moves the strut mount down by 1/4". These were made from 1/4" aluminum blocks and filled in around them with epoxy and flox. (One other possible fix is the make the area over the rear hinge convexed to clear the strut mount.)
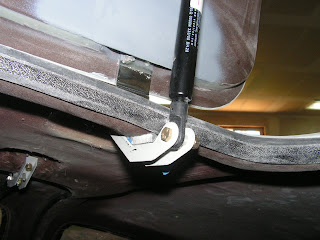


I have to say I am pleased both with the appearence and the fit.


One other small fix has to do with the locking rods and locking gear rack. On a few other RV-10 I have noticed some surface damage to the inner door panel casued by the pin that is safety wired to the gear rack and door lock rod. In fact, if you look at the picture below note the area were the grey primer is visable. To solve this interference I installed a small washer on the back side of the pin before finishing the safety wiring the pin in place. The washer keeps the pin from sticking out and hitting the inner fiberglass panel.


        One other quick mod was having the door hinges chromed by a local shop and replaced the supplied steel screws with structual stainless hardware from Aircraft Spruce. At the same time I also had the two bolt that hold the front sholder harnesses to the cabin top chromed as well.

        The cabin top hinge pockets where also fill in to fit snuggly around the hinges. This is done by appling packing tap over the hinges, bolting them in place and filling the void with epoxy and flox. If you do this make sure there is enough area around the hinge for the thikness of the paint.


        Wednesday, September 23, 2009

        Finishing? A long road!

        90% done and 90% to go! This has been one of the most interesting and time consuming parts of the project. sometimes I wonder did I build a metal airplane or a composite? Juries still out on that one! Anyway there are a lot of pictures here. Remember by clicking on a picture it will enlarge it for better viewing.


        These top pictures are of the required Service bulletin for the rear fuselage.


        Moving day! After fitting the gear it was time to move it down to the "big shop." this is an old picture taken in the fall of 2008.


        This is an older picture showing the fitting of the cowl and spinner. Since this was taken the cowl has been finished and the engnie baffles fitted.


        Never could get the stock door seals to where I liked them, so I went with the McMasters seals other builders have used. Now the doors can be closed with one hand.


        Interior Appointments


        Through this project I have stayed with the motto "simple and light." (Well most of the time;) For the interior I went with a textured paint (Rust-Oleum) over the epoxy primer. Wood armrests in back and matching (but not pictured) wood door thresholds. Also not pictured are some aluminum covers that cover the fuselage side forward of the front seats. The seats are by Cleveland Tool. Seatbelts are stock Van's Aircraft.


        Electrical Runs Under the baggage Floor

        From time to time the question of 'how to run the electrical under the baggage floor' comes up. Well, here is how I did it. As you will notice I ran a total of 6 of Van's Aircraft's conduit under the floor broads. This may be over kill, but I have used 5 of them so far.


        Panel Update


        If one thing is the focus point of an homebuilt aircraft it is the instrument panel. I haven't said much about it, until now, but here are some pictures of the finished panel. I went a head and had Pacific Coast Avionics do the panel wire and have to say it is nice work. Also, I am including some shots of the sub panels from earlier in the build.

        The panel includes:
        Advance 3500 with AOA & ARINC module
        TruTra DigiFlight II Autopilot
        Garmin 396 (for weather & backup navigation)
        Garmin 340 audio panel
        Garmin 430W
        Icomm A200
        Garmin GTX327 transponder
        Trutrak ADI with GPS
        Backup ASI
        Backup ALT
        EBC 406 ELT


        Saturday, April 11, 2009

        Auxilary Battery placement in the RV10


        Being we're building this RV10 for IFR flying I wanted a backup electric system for the Advance Flight Systems AFS 3500 EFIS. Rob Hickman makes a great built in battery pack that will give an hours worth of power for his EFIS system, however I also have a TruTrak ADI I want to run as well. So where to put a second battery? After trying a number of places I decided to mount a 7 amh gel cell on the top of the tunnel cover at the very front.

        It was a easy modification with the "tray" made from 1/16" by 3/4" aluminum anlge bent and riveted to the top of the tunnel cover. Then a hold down bar was made and two K1000-8 nut plates were added to the underside of the cover to hold everything in place. Also a sheet of foam rubber was added under the battery to finish the job. This set up should give me about 2 to 3 hours worth of power for the EFIS system. For charging I followed AeroElectric's guidelines for two battery systems.

        Tuesday, March 10, 2009

        How to connect Van's Aircraft manifold pressure hose to Advance Flight Systems manifold transducer


        Advance Flights Systems' manifold transducer has a 1/4" hose barb that needs to be conected to the supplied manifold pressure hose supplied with the VMP Install Kit from Van's. However, the supplied firewall fitting (VA-170) is for a 1/8" hose. The solution is to remove the small black plastic hose fitting and replace it with a new fitting with a 1/4" hose barb on one end and 10-32 threads on the other to thread into the VA-170. The fitting I used is pictured above in the middle of the photo. It came from McMasters Carr part number 5058K243 and is discribed as an aluminum single barbed tube fitting adapter fro 1/4" tube ID X 10-32 UNF male.


        Here you can see it threaded into the VA-170. When assembling these parts don't forget to use a sealant such as Fuel Lube. The install is then completed by running 1/4" hose from the firewall fitting to the transducer. Click on a picture to see an enlarged view.