Today's work will continue on the installation of the wiring for the Dynon SkyView. Also as I am installing ADS-B receiver option, so I will work on that as well.
Reference: Page 53-04
Step 1: NA Garmin tray has not yet been installed.
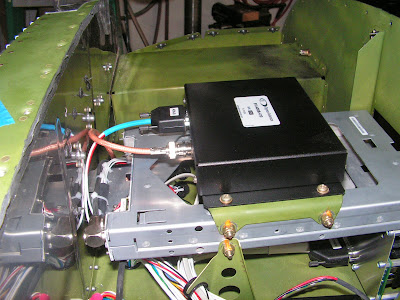
Step 2: Install the Skyview ADS-B Brackets to the Garmin Com Radio Tray.
Builder's notes: The Brackets are not the same! Also make sure you install them with the correct orientation. It took me a couple of tries to get it right.


Step 3: Install the ADS-B Receiver using the hardware called out by Van's Aircraft.

Step 4: Connect the 9 pin connector with the WHITE label to the ADS-B Receiver. Then route the harness through the cushion clamp near the cooling fan and connect the BLUE labeled connector to the Control Module.


Step 5: Connect the ADS-B antenna to the receiver.
This completes page 53-04.
Reference: page 53-08
Step 1: Install the 2 amp fuse for the ADS-B in the Power & Switch Module.

Step 2: Install the second fuse in the fuse holder Assembly.

This completes page 53-08 Reference: Page 42C-07
Step 5: Install the Garmin SL40 Radio into its tray.
Builder's note: I found out later during system testing, that the radio as it is pictured here is not completely seated and will not work!

This completes page 42C-07. Reference: Page 42C-08
Step 1: Install the Autopilot Harness connector to the control module.

Steps 2 & 3: Were done previously as part of a different section.
Step 4: NA As I am installing the autopilot.
This completes page 42C-08.
Reference: Page 42C-09
Step 1: Attach the Xponder tray to the back of the firewall.
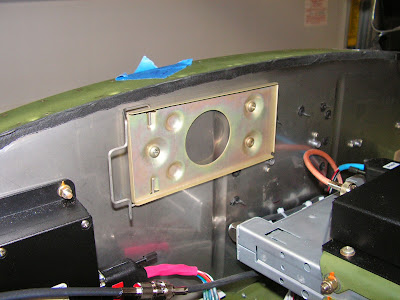
Step 2: Install the Xponder into its tray.

Step 3: Install the Transponder antenna Cable onto the transponder.

Step 4: Route the harness through the cuhsioned clamp and plug it into the Control Module.

That completes page 42C-09. Page 42C-10 deals with installing the comm and xponder antennas. While these have been test fitted they won't be installed until after paint.
That completes today's work on the RV-12 airplane.

