Today starts the fiberglass work on the RV-12 airplane canopy in ernest. Originally I planned on tinting the fiberglass black using epoxy tint from Tap Plastics, but I gave it to someone. Then I thought about using liquid Rite dye as West Epoxy systems suggested but after testing it I decided to just use epoxy as it comes and then covering the inside of the canopy bubble where it shows.
The RV-12 plans call for doing the two sides of the canopy fiberglass first and then trying to add the center fiberglass across the middle of the canopy. I decided to lay all three areas up at once. This will make for a much stronger layup. So today's entry is a mix of steps from the two pages. It's going to be a long day so let's get started.
Step 1, page 34-14; Contour the two foam blocks.


Step 2: Tape the canopy mask to both the left and right sides.

Step 2: Using the masks as a guide ran a strip of electrical tape from one side to the other side. Then laid a second layer of tape over it.

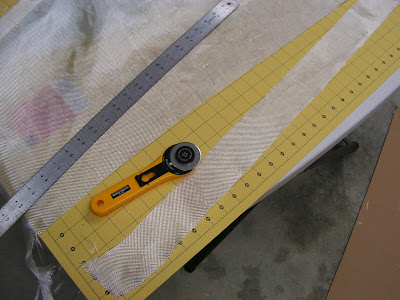
Step 4: Cut out the ten plies of 9 oz. fiberglass. A rotary cutter makes this very easy.


Step 1, page 34-15: Cut out the series of fiberglass strips as outlined.
Step 5, page 34-14: Sanded the exposed canopy with 60 grit sandpaper and clean it. Put packing tape over the duct tape so the exopy will pop loose after it has cured.

Builder's note: I used PVA mold release on the mylar tap versus the wax called out by Van's Aircraft, and let it dry before moving forward.

Step 6: Cut the upper edge of the canopy foam blocks to create a 1/8" shelf build these up with flox and epoxy.

Step 7 & 8 : Lay up the first layers of fiberglass cloth on plastic (I used poly material). Wet it with epoxy and lay it up on the RV-12 canopy.

Builder's note: The method I used is the do one layer on both sides and then the first layer of the center section. And then continued working this pattern up through all of the layers. Keep in mind the center section has 10 plys and the sides only have 5 so this need to be taken into consideration as layers are added. The trick is not to have pools of resin on the cloth. One method I've seen is to lay the next layer on dry and let it soak up the extra resin from the layer below. Then wet out any dry areas with more epoxy. Peal ply can then be placed over the finished layup. Because extra resin is just extra weight not strength.

Builder's note: I didn't cover the lower part of the fuselage under the canopy but it would be a good idea.
This completes pages 34-14 and 34-15. Step 5 on page 34-15 will be completed during the finishing of the canopy. With the heat left on I let the fiberglass work set and cure.

