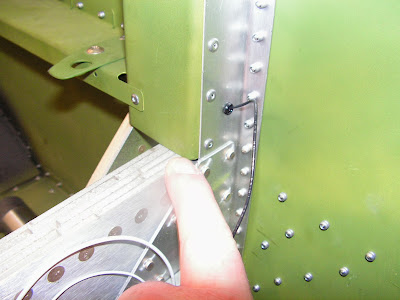
I had some challenges with fitting the wings on the RV-12. The spar slots in the fuselage needed to be opened on both sides of the fuselage and at the top of both spars. Also the spar retainer blocks needed to be shaved. Before doing this I did talk with Van's Aircraft to make sure there would be no structural problems. As Ken Scott put it, "this is one area where you need to go from an aircraft assembler to an aircraft builder."
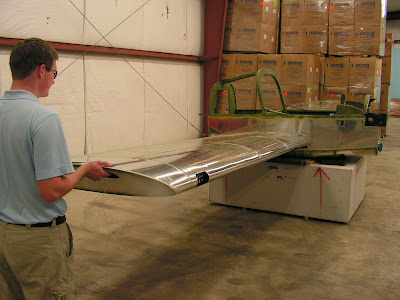
NOTE: Two people are needed to install and remove the wings. One person should stand forward of the wing spar at the fuselage to guide the spar into position and set the fuselage pins. The second person should be at the wing tip to lift and slide the wing into position. The person at the fuselage side will watch the spar is properly aligned, that the stud spars are lining up with their receptacles, and direct the person at the wing tip as needed. Make sure that the fuselage is well secured/stabilized before fitting the wings.
Step 6: Support the airplane.
Builder's note: I used the crate from the finishing kit with 2 inch pads on top of it to support the fuselage.
Step 7: Position the fuselage on the padded supports so that the supports line up with the lateral rivet patterns on the bottom of the bottom of the fuselage. If using a table, add support and padding to prevent damaging the bottom skins.

Step 8: With one person at each end of the wing, guide the left wing spar into the slot in the side of the Fuselage Skin. The wing spar should slide over the Roller and under the retainer Block on the opposite side. The retainer block will hold the wing in place as the fuselage pins are installed.

Builder's note: After trimming the slot in the fuselage and the retainer blocks this did work. I also found that slipping the pin in through just the left spar before installing the right wing was helpful. Also my spar rollers did not turn so they needed to be trimmed and the hole in the roller enlarged to roll freely on the bear surface. I ended up taking the wings on and off many time and trimming a little off the fuselage skins each time.


Reference page 30-03
NOTE: If the wing skins interfere with sliding the wings into place, they may be carefully trimmed until the fuselage pins will engage the wing spar. If the stub spar interferes with installation of the wing the stub spar may require local dressing with a file. The stub spars are to be coated with multipurpose anti-seize paste to prevent wear (delay until after painting.
Builder's note: I had no problem with the stub spars fitting.
Step 1: Align the stud spars in the froward and aft stub spar receptacles. Apply a light coating of general purpose grease to the Fuselage Pins then insert through the bushings in the Bulkhead Assembly and into the bushing in the left wing spar, but not protruding aft of the aft surface of the left spar. The fit will be snug. Turning the fuselage pin side to side while applying pressure will make installation easier.
Step 2: Place the remaining support under the left wing. Take care that the support is aligned with the wing ribs (not between them) to avoid denting the wing. The support may alternately be positioned under the optional eye bolt tie-down ring.
Step 3: With one person on each end of the right wing, slide the right wing over the Roller and user the Retainer Block on the opposite side. See page 30-02 figure 5 of the RV12 plans by Van's Aircraft. Slide the Fuselage Pins through the bushings in both wing spars and latch the Pin Latch with the retaining screws facing outboard. The retaining screws should be positioned outboard to prevent them from being depressed accidently.

Step 4: Check the gap between the wing skins and the fuselage. A minimum gap of 1/8 inch is required to allow for the Seal Strips (installed in Section 33 page 04.) Use a file to remove additional material from the wing skins to achieve the 1/8 inch gap.
Builder's note: I use aviation snips for part of this as there was a lot of material to remove where the fuselage reinforcement plates (part of the wing service Bulletin) are installed.

Builder's note: page 30-04 deals with installing the hardware for the flaperons. I temporarily installed the flaperons but will do the final install after painting. That all but wraps up this section 30. Until next time happy building.

