Saturday, October 20, 2012

Vans Aircraft RV-12 Airplane Build, Section 28: Fuel System (part 3)

Reference: page 28-06; 4.0 hours

This is the third and final entry on installing the fuel in the fuselage of the RV-12 aircraft kitted by Van's Aircraft. I have to say leaving the attachment of the RV12's tailcone until later has worked out very well when it comes to installing the fuel lines in the airplane fuselage.

Step 1: Attach the bulkhead fitting called out in Figure 1 to the F-1204D Center Section Bulkhead.


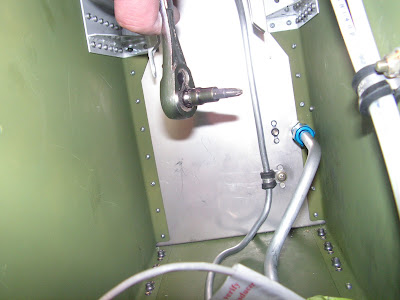
Builder's note: In the picture above you can see how the washer is modified to fit the lip in the bulkhead. In the picture below are the wrenches I used to Tighten the bulk head fitting. It is a two person job to install correctly.


Step 2: Make the Fuel Return Line Aft by unrolling and cutting 37.5" of 1/4" aluminum tubing. Start at the tank end of the tube. Insert a nut and sleeve over the end of the tube and then flare the end.


Step 3: Using the dimensions given in the side view on Page 28-07 bend the F-1259H Fuel Return Line Aft.

Step 4: Add a bend to the Fuel return Line Aft after it passes by the left side of the Fuel Pump to transition to the bulkhead fitting in the Center Section Bulkhead. Slip a sleeve and nut over the forward end of the return line then flare the end. Attach the return line to the bulkhead fitting.


Step 5: Make six F-1259K Pads by cutting lengths of EA HOSE H175 hose 3/4" long and then slit them lengthwise. Place these around both the F-1259F Fuel Line Tank - Pump and F-1259H Return Line as shown in the detail view in figure 1 of the RV-12 plans. At three locations clamp around both pieces of hoses as shown by Van's Aircraft in figure 1 on page 28-06.


Step 6: Make the F-1259M Fuel Return Line Fwd by unrolling and cutting off 71.25" of 1/4" aluminum tubing. Start at the forward end of the tube. Insert a nut and sleeve over the end of the tube and then flare the end.


Step 7: Measure back 14 1/4" from the forward end of the F-1259M fuel Return Line and mark a start of bend line. Make a 90 degree bend towards the clamp on the firewall shown in Figure 1 of the RV-12 airplane planes. Make the remaining bends as required to position the return line in the clamp on the firewall as well as aligning the top of the line with the return line hole in the Firewall Shelf. The distance on the completed return line to the lower face of the firewall shelf should match the dimensions given in the Detail View in Figure 1 .


Step 8: Feed the Fuel Return Line through snap bushings to the bulkhead fitting on the Center Section Bulkhead. Lay the tube into the left most recess for a tube in the System Blocks adding a slight curve to follow the curvature of the Bottom Skin.

Step 9: Slide the Fuel return Line Aft while curving it with your hands to exit the fuselage bottom through the center bottom access hole.

Step 10: Insert a nut and sleeve over the end of the Fuel Return Line and flare the end. Re-straighten the curve formed in Step 9 as the fuel return line is slid forward to its installed position. Attach the fuel line to the bulkhead fitting.


Step 11: Attach the union bulkhead fitting to the Firewall Shelf per callouts in Figure 1 on page 28-06 of the RV-12 airplane plans. Attach the Fuel Return Line to the union bulkhead fitting.


This completes page 28-06 of the RV-12 plans and section 28. After this I vacuum tested the complete system with good results (no Leaks.)

Thursday, October 11, 2012

Van's Aircraft Announces RV-12 offered as SLSA!

Van's Aircraft just announced that the RV-12 airplane is being offered as a completely built fly-away aircraft. The price will run between $105,000 and $115,000 depending on options. First deliveries are expected in early 2013.These aircraft will be produced in partnership with Synergy of Eugene, Oregon.

The RV-12 is a great airplane and this will make it available to a much larger aviation audience. Could this be the reinvention of the general aviation industry? Time will tell but either way this is cool!


Here is a link to the Introductory Video.

Sunday, October 7, 2012

Vans Aircraft RV-12 Airplane Build, Section 28: Fuel System (part 2)

Reference: page 28-03, -04, -05; 2.5 hours

This is the second work session of the fuel line in the RV-12 aircraft's fuselage. Everything went pretty well, but I am glad I had extra fuel line to work with! Read on for an explanation.

Step 1: Straighten out two feet of 3/8" aluminum tubing. (Unrolling against a flat surface works well). Make the F-1295F Fuel Line Tank- Pump by starting at the pump end. Slip the nut then the sleeve called out in Figure 1 of the RV-12 plans on page 28-03 over the tubing.


Step 2: Flare the end of the tube. Slide the sleeve up tight against the flare. Make the first 90 degree bend. Bend the second 90 degree bend and then the 15 degree bend to match the templte in Figure of Van's Aircraft's plans. Make the final 90 degree bend going up to the tank by referencing Veiw A-A in Figure 1 and 2 on page 28-03 of the RV-12 aircraft plans.

Builder's note: I use a drop of light oil on the flaring tool . It helps make a nice smooth flare.


Step 3: Laying the tube over the figure 1, Veiw A-A mark the end of tube. Cut the tube off. Place the nut and sleeve over the end of the tube. Check that the other nut and sleeve have not fallen off the tube. Flare the tank end of the tube.


Step4: Install the Fuel Line Tank - Pump to the Fuel Pump as shown in Figure 2. A small amount of bending/adjustment using your hands is acceptable.


Reference page 28-04

NOTE: When installing the fuel lines it is acceptable to bend a large radius curve by hand to improve access, then re-straighten after you are finished.

Step 1: Make the F-1259E Fuel line Pump - Valve by unrolling and cutting off 40.5" of 3/8 inch aluminum tubing. Start at the pump end of the tube. Insert a nut and sleeve over the end of the tube and then flare the end of the tube.


Step 2: Make an S type bend in the Fuel Line Pump - Valve as shown in figure 3 of the RV-12 plans on page 28-04, between the pump and the F-1204D Center Section Aft Bulkhead.


Step 3: Insert the Fuel Line Pump-Valve through the snap bushings in the F-1204A Bulkhead. Temporarily attach the nut to the ES 40105 FUel Pump. Lay the tube into the right most recess in the System Blocks adding a slight curve to follow the curvature of the Bottom Skin. Add two slight bends to the fuel line where it passes through the F-1203A Bulkhead to align the front of the tube with the fitting on the fuel valve. Mark then cut the forward end of the tube as shown in figure 2 on page 28-04.

Builder's Note: I temporarily installed the flap lever to insure the clearance between it and the fuel line. Wearing holes in fuel lines is a bad thing!


Step 4: Detach the nut from the Fuel Pump, pull the Fuel Line back enough to slip a nut and sleeve over the end of the fuel line and flare the end of the tube.


Step 5: Connect the forward end of the Fuel Fine Pump-Valve to the rear fitting of the Fuel Valve. Reconnect the aft end to the Fuel Pump.


Reference 28-05br/>
Builder's note: The RV-12 kit comes with one of two different fuel flow meters. Mine was the FT-60 model.

Step1: Install the fluid fittings to the Fuel Flow Meter than install the assembly to the VA-188 FLO-SCAN Mount per the hardware callouts( use a small amount of pipe thread sealant.) The forward bolt used to install the FT-60 is only temporarily installed until later.


Step 2: Install the elbow fluid fitting, both plugs and the drain to the GAS-5 Gascolator per the callouts in the detail view in Figure 1 (use a small amount of pipe thread sealant.) safety wire the four screws holding the gascolator bowl to the top of the gascolator.


Step 3: Install the GAS-5 Gascolator to the Firewall Bottom using the hardware called out by Van's Aircraft. Install the straight nipple to pipe fluid fitting into the gascolator from the aft side of the firewall bottom using pipe thread sealant.


Step 4: Make the Fuel line Floscan-Fwall by unrolling 8.75" of 3/8" aluminum tubing. Start at the Gascolator end of the tube. Insert a nut and sleeve over the end of the tube and then flare the end of the tube. Make the two bends aft of the gascolator using the template given in Figure 2 on page 28-05 of the RV-12 aircraft Plans. Insert a nut and sleeve over the flo-scan end of the tube and then flare the end of the tube. Attach the completed fuel line to the gascolator and the FT-60 Fuel Flow Meter.


Step 5: Make the Fuel LineValve-Floscan by unrolling and cutting off 13 3/16" inches of 3/8" aluminum tubing. Start at the FUEL Valve end of the tube. Insert a nut and sleeve over the end of the tube and then flare the end of the tube. Add two bends to the fuel line between the FEUL VLAVE and the F-1202F Bulkhead using the template given in FIgure 3 of the RV-12 plans page 28-05. Insert the tube through the snap bushing in the bulkhead. Insert a nut and sleeve over the forward end of the tube and then flare the end of the tube. Attach the completed fuel line to the Fuel Flow Meter and the FUEL VALUVE.


What's wrong with the picture above? Look at the fluid nut. Yes, it's on back words! I made a new fuel line and problem solved!


This completes pages 28-03, -04, -5 of the RV-12 airplane plans. I went ahead and vacuum tested the fuel lines from the fuel tank through the gascolator with good results. Next time I will finish the fuel lines in the airframe.


Friday, October 5, 2012

Vans Aircraft RV-12 Airplane Build, Section 28: Fuel System (part 1)

Reference: page 28-02; 1.5 hours

Today starts a new section for the RV-12 airplane kit by Van's Aircraft. If working with aluminum tubing is a new experience, try picking some extra material up and play with it. Also remember aircraft fitting do not use a standard plumping flares. I purchased my aircraft flaring tool from Aircraft Tool Supply, however other distributors such as Aircraft Spruce are a good source.

Step 1: Install fluid fittings into the Fuel Pump (use a small amount of pipe thread sealant.)


Step 2: Install the Fuel Pump to the Facet Pump Bracket (check the flow direction.)


Step 3: Drill #30 the FUEL VALVE Handle per the dimensions given by Van's Aircraft in figure 2 on page 28-02.


Step 4: Install the Red Knob to the Fuel Valve Bracket per the instructions supplied with the knob.


Step 5: Install the other end of the Fuel Valve Bracket handle. Install the fluid fitting shown in Figure 3 of the RV-12 plans on page 28-02 to the FUEL VALVE (use a small amount of pipe sealant.)


Step 6: Install the fluid fitting through the Fuel Valve Bracket as shown in Figure 4 of the RV-12 plans page 28-08 (use a small amount of pipe thread sealant.)

Step 7: Rivet the Fuel Valve Clip per the call-out in figure 4.


Step 8: Rivet the Fuel Valve Bracket to the Bottom Skin.


Builder's note: The manufactured head should be on the outside skin. In other words pull the rivets from the bottom side of the belly skin.

Also below is a picture of a crowfoot wrench attachment on my torque wrench. They are very handy when working on fluid lines. This one comes in a set from Craftsmen.


That's all there is to page 28-02! Enjoy and we will see you next time.